HTML Head Element Tag Explained: Purpose, Syntax, Examples, and Best Practices for Web Developers
HTML Tutorials · HTML - The Head Element Tag · Introduction
Mastering the HTML Head Element: Purpose, Syntax, Common Tags, and Developer Tips
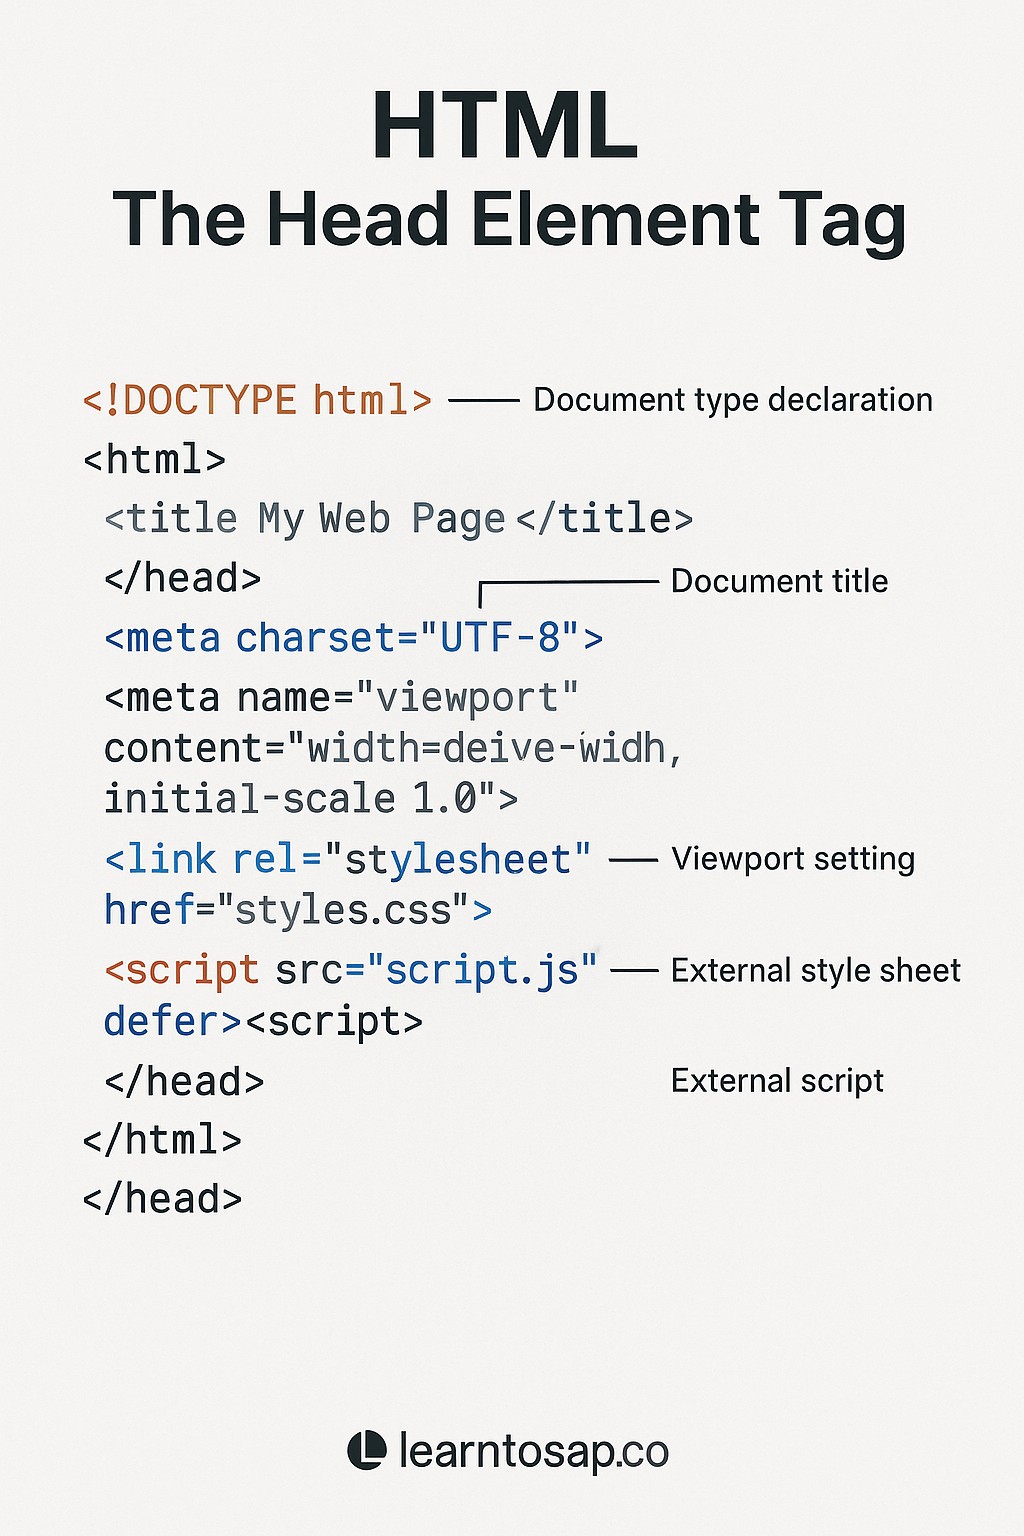
In <head> element in HTML contains meta-information about the webpage. It doesn't display content directly on the page instead, its helps the browser understand the pages, and loads essential files like stylesheets, fonts, and scripts. <head> element is a container for the following elements: <title>, <style>, <meta>, <link>, <script>, and <base>.
This tutorial covers four numbered examples, from a bare title to a full document structure, along with a tag-by-tag breakdown, the recommended tag order, SEO and social-sharing meta tags, the base tag, async versus defer for scripts, and how the head section affects page load performance, plus a live playground further down the page where you can test any head configuration instantly.
🔄 Why It Use:
- 🔄 Improves SEO and social sharing
- 🔄 Enables responsive design
- 🔄 Sets page title and encoding
Common Tags Inside <head>
Before working through the numbered examples below, here is a quick reference to the most common tags you will find inside a real <head> section.
🔍 Tag Breakdown
| Tag | Purpose |
|---|---|
| <title> | Sets the title shown in the browser tab |
| <meta charset="UTF-8"> | Sets character encoding (UTF-8 is standard) |
| <meta name="..."> | Describes page (for SEO, responsiveness, etc.) |
| <link rel="stylesheet"> | Links external CSS file |
| <link rel="icon"> | Sets favicon (browser tab icon) |
✅ 1) Basic Head Element with Title
<head>
  <title>My First Web Page</title>
</head>
✅ 2) Adding a Character Set and Viewport for Responsiveness
<head>
  <meta charset="UTF-8">
  <meta name="viewport" content="width=device-width, initial-scale=1.0">
  <title>Responsive Page</title>
</head>
✅ 3) Including a Favicon
<head>
  <title>With Favicon</title>
  <link rel="icon" href="favicon.ico" type="image/x-icon">
</head>
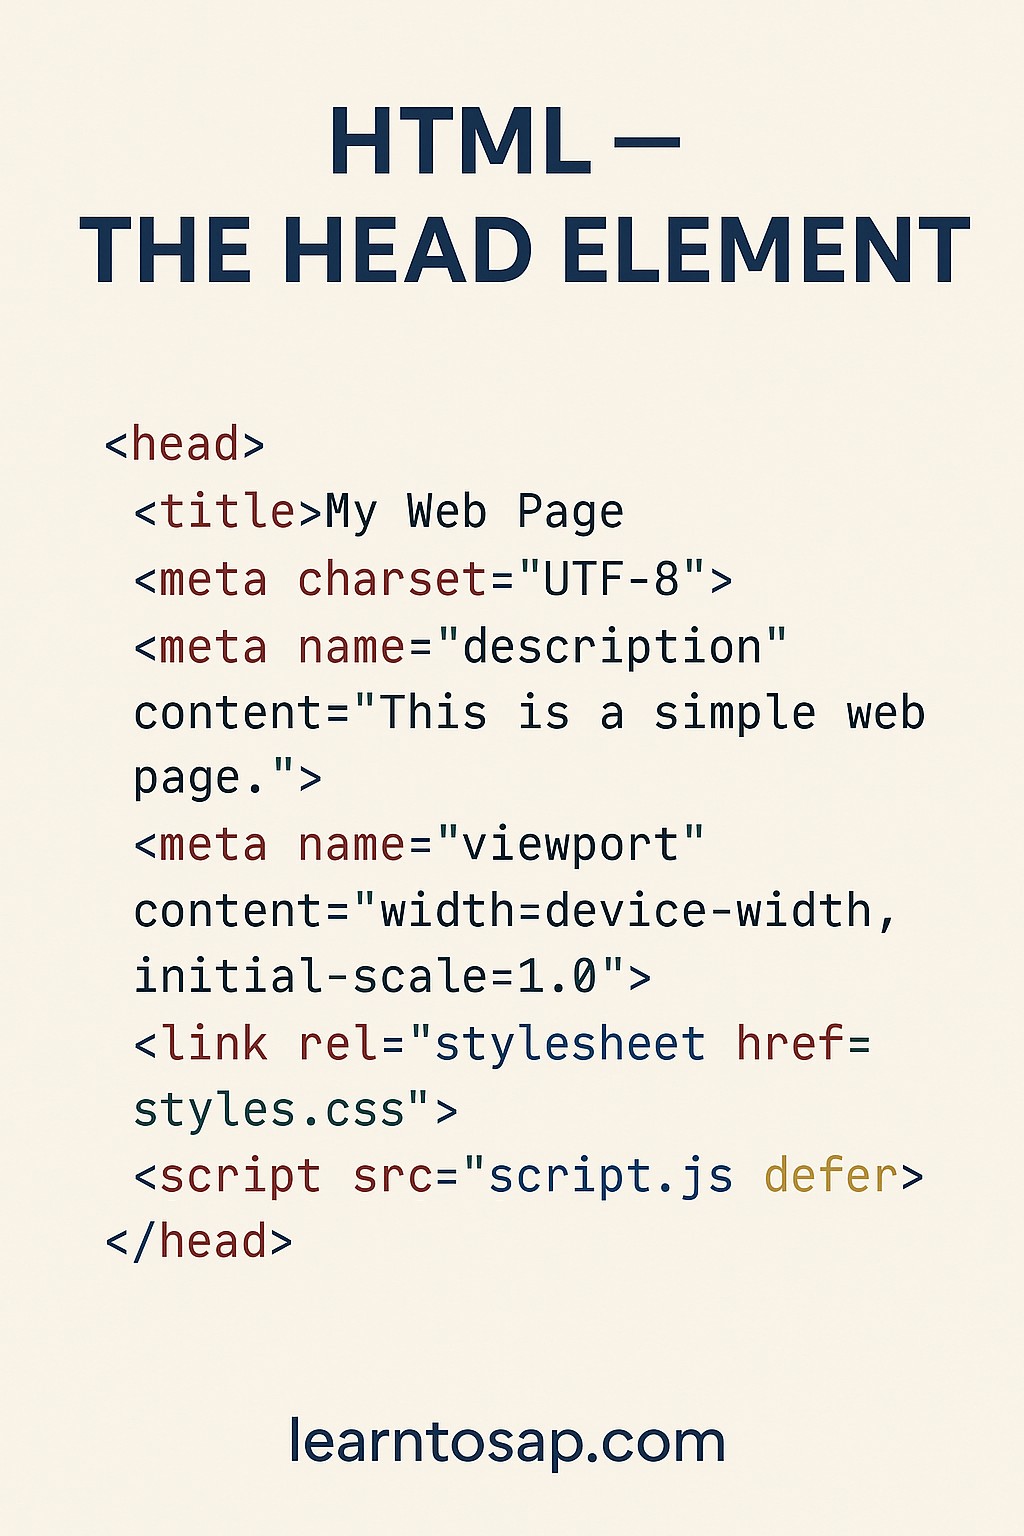
✅ 4) Basic Structure
<!DOCTYPE html>
<html>
<head>
  <title>My Web Page</title>
  <meta charset="UTF-8">
  <meta name="description" content="This is a simple web page.">
  <meta name="viewport" content="width=device-width, initial-scale=1.0">
  <link rel="stylesheet" href="styles.css">
  <script src="script.js" defer></script>
</head>
<body>
  <!-- Visible content goes here -->
</body>
</html>
Try It Yourself (Copy This Code and Paste. See how it works). Paste any of the four examples above into the live playground below and add your own title, meta tag, or link to see how the head section comes together.
Live Code Preview
Understanding Each Head Tag in Depth
The four numbered examples above show each tag in isolation. Here is what each one is actually doing and why it matters.
- <title> sets the text shown in the browser tab, in bookmarks, and, in most cases, as the clickable headline in search engine results. Every page should have exactly one, and it should be unique across your site.
- <meta charset="UTF-8"> tells the browser which character encoding the page uses. UTF-8 supports virtually every language and symbol, which is why it is the near-universal standard today.
- <meta name="viewport"> controls how a page scales on mobile devices. Without it, phones often render a page at desktop width and then zoom out, making text tiny and hard to read.
- <meta name="description"> supplies the short summary many search engines display underneath a page's title in search results, directly influencing whether someone clicks through.
- <link rel="stylesheet"> connects an external CSS file, exactly the external CSS technique covered earlier in this tutorial series, so a page's visual styling loads before the body renders.
- <link rel="icon"> sets the small favicon shown in a browser tab, bookmark list, and history, a small detail that still contributes to a site feeling polished and recognizable.
- <script> either embeds or links JavaScript, and, as Example 4 shows with its defer attribute, is often placed in the head specifically so it downloads early without blocking the page from rendering.
Order Matters: Recommended Tag Sequence Inside <head>
Browsers are forgiving about the exact order of tags inside <head>, a page will not break if you reorder them, but a consistent, recommended sequence avoids subtle rendering quirks and keeps every page on a site predictable.
- <meta charset="UTF-8"> first, so the browser knows how to interpret every character that follows.
- <meta name="viewport"> next, before any layout-affecting resources load.
- <title>, so the tab title appears as early as possible.
- Remaining <meta> tags (description, Open Graph, Twitter Card).
- <link> tags for stylesheets and the favicon.
- <script> tags, ideally with defer or async when they do not need to run immediately.
Meta Tags for SEO and Social Sharing
Beyond the description tag already covered, two extra families of meta tags shape how a page's link looks when shared on social platforms and how search engines are instructed to treat it.
<meta name="robots" content="index, follow">
<meta property="og:title" content="My Web Page">
<meta property="og:description" content="This is a simple web page.">
<meta property="og:image" content="preview.jpg">
<meta name="twitter:card" content="summary_large_image">| Meta Tag | Purpose |
|---|---|
| robots | Tells search engines whether to index the page and follow its links |
| og:title / og:description / og:image | Controls the title, text, and image shown when a link is shared on Facebook, LinkedIn, or WhatsApp |
| twitter:card | Controls how the link preview appears when shared on X/Twitter |
The <base> Tag Explained
The intro to this tutorial lists <base> as one of the elements allowed inside <head>, though none of the four numbered examples demonstrate it. It sets a default URL and/or target window for every relative link and resource on the page.
<head>
  <base href="https://www.learntosap.com/" target="_blank">
</head>
<body>
  <a href="htmltutorial1.html">What Is HTML?</a>
</body>
With that <base> tag in place, the relative link htmltutorial1.html resolves to https://www.learntosap.com/htmltutorial1.html automatically, and opens in a new tab, without needing to write the full URL or a target attribute on every single link. A page can only have one <base> tag, and it should appear early in the head, before any relative links or resources it is meant to affect.
Best Practices for a Clean and Effective <head>
- Always include charset, viewport, and title, the three tags every real page needs at a minimum.
- Write a unique, descriptive title and meta description for every page, rather than reusing the same generic text sitewide.
- Use defer on scripts placed in the head so they do not block the page from rendering while downloading.
- Keep the head lean, loading only the stylesheets, fonts, and scripts a page genuinely needs, since every extra request delays the page.
- Add Open Graph and Twitter Card tags for any page likely to be shared, so link previews look intentional rather than blank or broken.
Common Mistakes in the <head> Section
- Forgetting the viewport meta tag, leaving a page zoomed out and hard to read on mobile devices.
- Omitting or duplicating the title tag, both of which confuse browsers, bookmarks, and search engine listings.
- Placing heavy, render-blocking scripts in the head without defer or async, which can noticeably slow down how quickly a page becomes visible.
- Writing visible content inside <head>, which browsers will not render, since only <body> content is meant to be seen.
- Skipping meta description and Open Graph tags, leaving search results and shared links looking generic or incomplete.
Practice Exercises: Build Your Own <head> Section
The fastest way to make every head tag feel familiar is to assemble a few variations yourself. Try each of these directly in the live editor above:
- Build a minimal head with just a title, then add charset and viewport meta tags one at a time.
- Add a meta description and check how it would read as a search result snippet.
- Add Open Graph tags for a page title, description, and image.
- Add a <base> tag and a relative link, and confirm where it resolves to.
- Reorder the tags in your head section to match the recommended sequence covered on this page.
Working through these five exercises covers every tag discussed in this tutorial, from the absolute basics to SEO and social-sharing metadata.
Real-World Example: A Production-Ready Head Section
To see nearly every tag from this tutorial working together the way a real, published page would use them, here is a more complete head section combining charset, viewport, title, description, favicon, Open Graph tags, and a deferred script:
<head>
  <meta charset="UTF-8">
  <meta name="viewport" content="width=device-width, initial-scale=1.0">
  <title>Blue Bottle Coffee Guide | LearnToBrew</title>
  <meta name="description" content="A beginner's guide to brewing coffee at home, from beans to cup.">
  <link rel="icon" href="favicon.ico" type="image/x-icon">
  <link rel="stylesheet" href="styles.css">
  <meta property="og:title" content="Blue Bottle Coffee Guide">
  <meta property="og:description" content="A beginner's guide to brewing coffee at home.">
  <meta property="og:image" content="coffee-guide-preview.jpg">
  <meta name="twitter:card" content="summary_large_image">
  <script src="analytics.js" defer></script>
</head>
Reading through this example top to bottom: charset and viewport come first exactly as the recommended sequence earlier on this page suggests, followed by a unique title and description written specifically for this page rather than a generic placeholder, a favicon and stylesheet link, a full set of Open Graph and Twitter Card tags so the page looks intentional when shared, and finally a deferred analytics script that will not block the page from rendering while it downloads.
How the Head Section Affects Page Load Performance
Everything inside <head> loads before the browser can finish building the visible page, which makes this section directly responsible for a meaningful share of how fast a page feels to a first-time visitor.
- Render-blocking stylesheets and scripts in the head delay the browser from painting anything on screen until they finish downloading, which is why the defer attribute on Example 4's script matters.
- A large number of external resources linked in the head, extra fonts, tracking scripts, stylesheets, each add their own network request before the page can fully render.
- The viewport meta tag is not just about mobile appearance, its absence can also trigger a slower, two-pass rendering process on some mobile browsers.
Keeping the head lean, only including what a page genuinely needs and deferring what it does not need immediately, is one of the simplest, highest-leverage habits for a fast-loading site.
head vs body: Where Does Content Belong?
A common beginner mix-up is placing something visible, like a heading or an image, inside <head> by mistake. Browsers simply will not render it there, no matter how the tag is written.
| <head> | <body> |
|---|---|
| Metadata: title, meta tags, links, scripts | Everything a visitor actually sees |
| Never rendered directly on the page | Rendered as the visible page content |
| Loaded before the page paints | Painted as the browser parses it |
This is the same head-and-body division that has appeared throughout this HTML tutorial series: every full-document example on this page nests its <head> and <body> as two clearly separate siblings inside <html>, exactly the structural skeleton every HTML page follows.
async vs defer: Choosing How Scripts Load
Example 4's script tag uses defer, but async is the other common option for a script placed in the head, and the two behave meaningfully differently.
| Attribute | Behavior |
|---|---|
| (none) | Downloads and runs immediately, blocking the page from rendering further until it finishes |
| async | Downloads in parallel with page parsing, then runs as soon as it arrives, possibly out of order relative to other scripts |
| defer | Downloads in parallel, but waits to run until the HTML has fully parsed, in the order the scripts appear |
defer is generally the safer default for scripts that need the full page structure to exist before they run, such as one that looks up an element by id, exactly the kind of script pattern covered in this series' JavaScript tag tutorial. async suits independent scripts, like analytics trackers, that do not depend on anything else on the page and do not need to run in any particular order.
Frequently Asked Questions About the HTML Head Element
What is the HTML head element?
The HTML head element contains metadata such as title, meta tags, styles, and scripts that are not displayed on the page.
What is included inside the head tag?
The head tag includes title, meta tags, link tags, style, and script elements, and also the base element.
Is the head tag visible in a webpage?
No, the head element content is not directly visible to users but is used by browsers and search engines.
Why is the head tag important for SEO?
The head tag contains meta tags and title which help search engines understand and rank the page.
Does the order of tags inside head matter?
Browsers are forgiving about order, but placing charset and viewport meta tags first, followed by the title, is the widely recommended sequence for consistent, fast rendering.
What is the base tag used for?
The base tag sets a default URL and/or default target for every relative link and resource on the page, so individual links do not need to repeat the full path.
What is the difference between async and defer on a script tag?
async downloads a script in parallel with page parsing and runs it as soon as it arrives, potentially out of order with other scripts. defer also downloads in parallel but waits to run the script until the HTML has finished parsing, in the order the scripts appear.
Can content be placed directly inside the head tag?
No. Anything meant to be visible to a visitor, such as a heading, paragraph, or image, must go inside the body tag. Browsers do not render visible content placed inside head.