CSS Syntax – Complete Beginner's Guide with Examples (2026-27)
CSS syntax is the set of rules that defines how CSS statements must be written for the browser to understand and apply them. Every CSS rule follows the same structure: a selector that targets HTML elements, followed by a declaration block containing property:value pairs. Getting the syntax right is the foundation of everything in CSS. In this beginner-friendly guide you will learn the complete CSS syntax — selectors, properties, values, declaration blocks, multiple selectors, grouping, comments, whitespace rules, and specificity — with a live interactive code editor, a Yes/No quiz, and clear examples throughout.
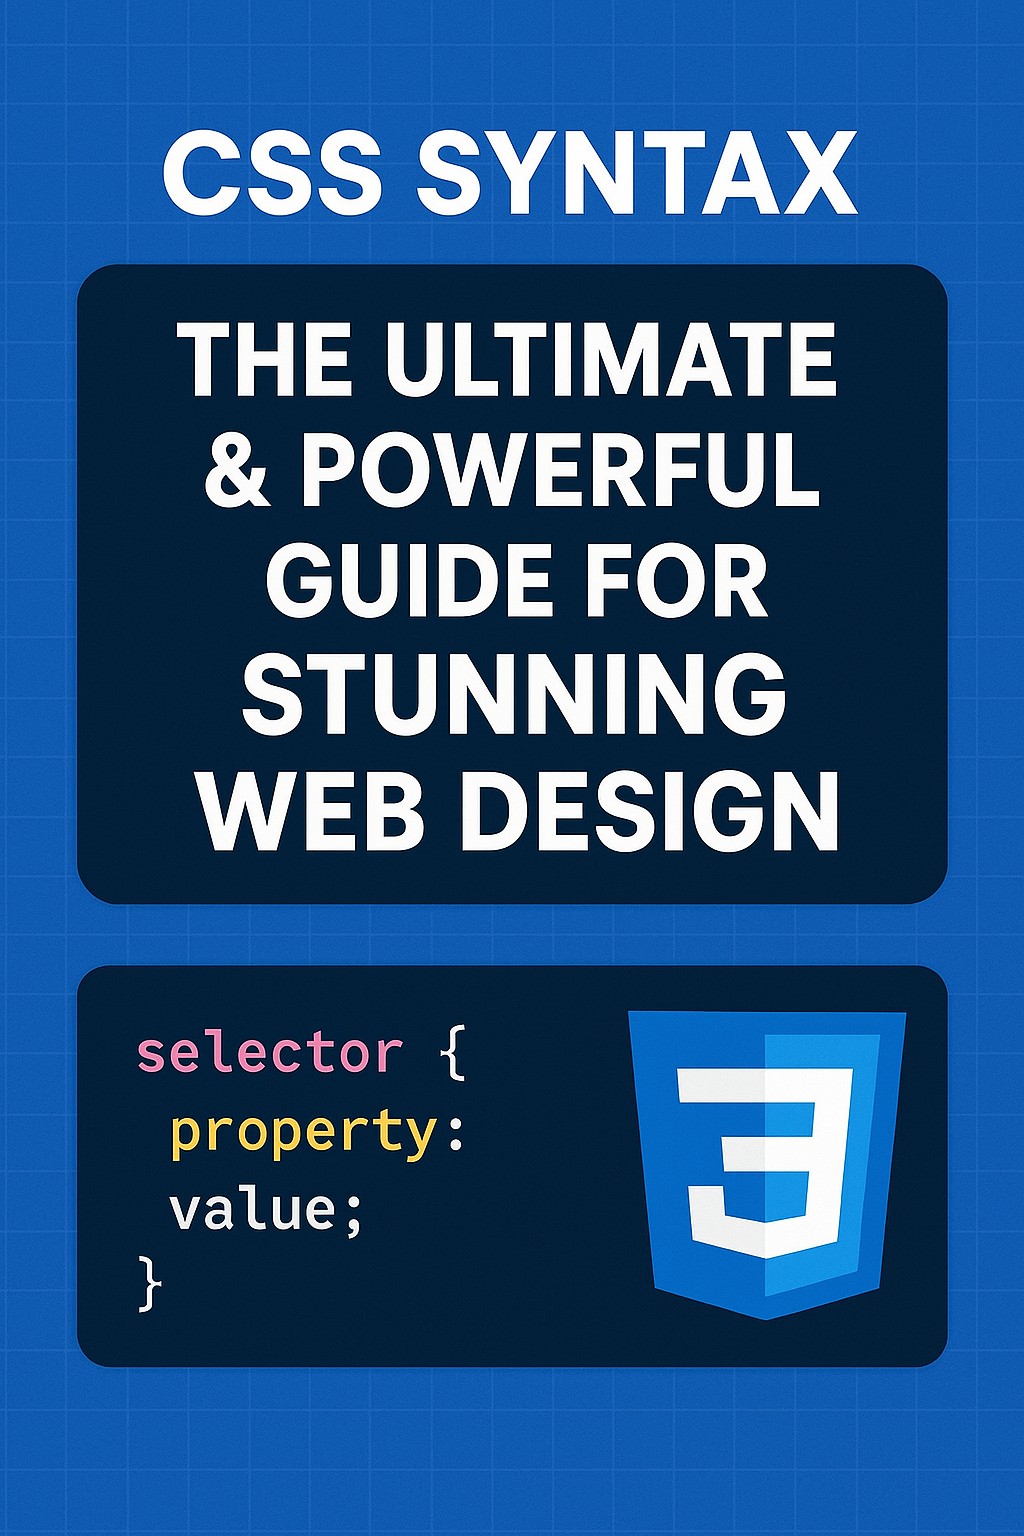
✅ CSS Syntax Structure
Every CSS rule has the same structure. Understanding this structure is the foundation of all CSS writing:
✅ Real Example:-
h1 {
  color: blue;
  font-size: 32px;
  text-align: center;
}| Part | In Example | Purpose |
|---|---|---|
| Selector | h1 | Targets all <h1> elements on the page |
| Declaration Block | { ... } | Contains all the style declarations for this rule |
| Property | color, font-size, text-align | The style characteristic to change |
| Value | blue, 32px, center | What to set the property to |
| Colon | : | Separates property from value — required |
| Semicolon | ; | Ends each declaration — required after every property:value pair |
| Curly Braces | { } | Wrap the declaration block — required |
✅ What is a CSS Selector?
A CSS selector is the part of a CSS rule that identifies which HTML element(s) to style. The selector is written before the opening curly brace {.
✅ A selector can target one element, multiple elements, elements with a specific class, elements with a specific ID, or elements in a specific state (like hover).
✅ Examples of different selectors:-
/* Element selector — targets all <p> tags */
p { color: #333; }

/* Class selector — targets elements with class="highlight" */
.highlight { background: yellow; }

/* ID selector — targets the element with id="header" */
#header { font-size: 28px; }

/* Universal selector — targets ALL elements */
* { box-sizing: border-box; }

/* Descendant selector — <a> inside <nav> */
nav a { color: #0EA5E9; }✅ Types of CSS Selectors
p { color: red; }.box { padding: 10px; }#nav { display: flex; }* { margin: 0; }nav a { color: blue; }a:hover { color: red; }| Selector | Syntax | Selects | Example |
|---|---|---|---|
| Element | tag | All elements of that tag | p { } |
| Class | .classname | All elements with that class | .btn { } |
| ID | #idname | One element with that ID (unique) | #hero { } |
| Universal | * | Every element on the page | * { } |
| Grouping | A, B | Both A and B | h1, h2 { } |
| Descendant | A B | B elements inside A | nav a { } |
| Child | A > B | Direct children B of A only | ul > li { } |
| Pseudo-class | :hover :focus :first-child | Elements in a specific state | a:hover { } |
| Pseudo-element | ::before ::after ::first-line | Virtual parts of elements | p::first-line { } |
| Attribute | [attr=value] | Elements with a specific attribute | input[type="text"] { } |
✅ CSS Property and Value
A CSS property is the style characteristic you want to change. A CSS value is what you set that property to. They are always paired with a colon between them.
✅ Format: property: value;
color: red;               /* text color */
font-size: 16px;          /* text size */
background-color: yellow; /* background color */
margin: 20px;             /* space outside element */
padding: 10px 20px;       /* space inside element */
border: 2px solid black;  /* border around element */
display: flex;            /* layout mode */
width: 100%; /* element width */| Property | Controls | Example Values |
|---|---|---|
color | Text color | red, #1E3A5F, rgb(0,0,255) |
background-color | Background color | blue, #F0F9FF, transparent |
font-size | Text size | 16px, 1.2rem, large |
font-family | Typeface | Arial, sans-serif, 'Roboto' |
margin | Space outside element | 0, 10px 20px, auto |
padding | Space inside element | 10px, 5px 15px 10px 20px |
border | Border around element | 1px solid #ccc, 2px dashed red |
width / height | Element dimensions | 200px, 50%, auto |
display | Layout type | block, inline, flex, grid |
text-align | Text alignment | left, center, right, justify |
✅ CSS Declaration Block
The declaration block is everything inside the curly braces { }. It contains one or more declarations, where each declaration is a property: value; pair.
✅ Structure:-
selector {               /* ← Opening brace starts declaration block */
  property: value;       /* ← Declaration 1 */
  property: value;       /* ← Declaration 2 */
  property: value;       /* ← Declaration 3 */
}                        /* ← Closing brace ends declaration block */
✅ Real Example:-
p {
  color: #333;
  font-size: 16px;
  line-height: 1.8;
  margin: 0 0 16px 0;
  font-family: Arial, sans-serif;
}✅ Opening
{ must immediately follow the selector✅ Every declaration must end with a
; semicolon✅ The last declaration's semicolon is optional but always include it — adding properties later won't break the rule
✅ The closing
} must match every opening {
✅ Multiple Properties in One Rule
You can add as many property: value; pairs as needed inside one declaration block. Each pair is on its own line (recommended) and ends with a semicolon.
✅ Example – Styling a button completely:-
.btn {
  background-color: #0EA5E9;  /* background */
  color: #ffffff;              /* text color */
  font-size: 15px;             /* text size */
  font-weight: bold;           /* bold text */
  padding: 12px 28px;          /* inner spacing */
  border: none;                /* no border */
  border-radius: 8px;          /* rounded corners */
  cursor: pointer;             /* pointer cursor on hover */
  text-transform: uppercase;   /* ALL CAPS text */
  letter-spacing: 1px;         /* spacing between letters */
  transition: background 0.2s; /* smooth hover transition */
}✅ Multiple Selectors (Grouping Selectors)
If several different HTML elements need the same CSS styles, you can group them into one rule by separating selectors with commas. This avoids repeating the same code.
✅ Without grouping (repetitive):-
/* BAD: repeated same declarations */
h1 { color: #1E3A5F; font-family: Arial, sans-serif; }
h2 { color: #1E3A5F; font-family: Arial, sans-serif; }
h3 { color: #1E3A5F; font-family: Arial, sans-serif; }
h4 { color: #1E3A5F; font-family: Arial, sans-serif; }
✅ With grouping (clean and DRY):-
/* GOOD: group with commas */
h1, h2, h3, h4 {
  color: #1E3A5F;
  font-family: Arial, sans-serif;
}
✅ More grouping examples:-
/* Group elements AND classes */
p, .description, article {
  font-size: 15px;
  line-height: 1.8;
  color: #444;
}

/* Group form elements */
input, textarea, select {
  border: 1px solid #ddd;
  padding: 8px 12px;
  border-radius: 4px;
  width: 100%;
}✅ CSS Whitespace and Formatting
CSS ignores extra whitespace (spaces, tabs, newlines) between rules and declarations. You can format your CSS however you like — browsers only care about the syntax, not the spacing.
✅ All of these are identical to the browser:-
/* Style 1 — expanded (recommended for development) */
h1 {
  color: blue;
  font-size: 32px;
}

/* Style 2 — compact */
h1 { color: blue; font-size: 32px; }

/* Style 3 — minified (for production deployment) */
h1{color:blue;font-size:32px;}✅ The CSS Cascade – Which Rule Wins?
When multiple CSS rules apply to the same element, the browser uses the cascade to determine which rule wins. The cascade considers three things — in this order:
1. Importance — !important declarations override everything else.
2. Specificity — More specific selectors win over less specific ones.
3. Source Order — When specificity is equal, the rule that appears last in the CSS wins.
✅ Source order example:-
p { color: red; }    /* First rule */
p { color: blue; }   /* Second rule — WINS because it comes last */
/* Result: paragraph text is blue */1.
!important declarations2. Inline styles (
style="...")3. ID selectors (
#id)4. Class, attribute, pseudo-class selectors (
.class, [attr], :hover)5. Element, pseudo-element selectors (
h1, ::before)6. Universal selector (
*)7. Browser default styles
✅ CSS Specificity – How It's Calculated
Specificity is a score that determines which CSS rule takes priority when multiple rules target the same element. Think of it as a 4-digit number (0,0,0,0):
| Selector Type | Specificity Points | Example | Score |
|---|---|---|---|
!important | Overrides everything | color: red !important | ∞ |
| Inline style | 1,0,0,0 | style="color:red" | 1000 |
| ID selector | 0,1,0,0 | #nav | 100 |
| Class / attribute / pseudo-class | 0,0,1,0 | .btn [type] :hover | 10 |
| Element / pseudo-element | 0,0,0,1 | h1 p ::before | 1 |
| Universal selector | 0,0,0,0 | * | 0 |
✅ Specificity calculation examples:-
p              /* 0,0,0,1 = specificity 1   — element */
.text          /* 0,0,1,0 = specificity 10  — class   */
#main          /* 0,1,0,0 = specificity 100 — ID      */
p.text         /* 0,0,1,1 = specificity 11  — element + class */
#main p.text /* 0,1,1,1 = specificity 111 — ID + element + class */p { color: red; } → specificity: 1.text { color: blue; } → specificity: 10 — WINSEven though
p rule comes last, .text has higher specificity, so text is blue.
✅ The !important Rule
Adding !important after a CSS value gives that declaration the highest possible priority — overriding all other rules regardless of specificity or source order.
✅ Syntax:-
p {
  color: red !important; /* this wins over EVERYTHING */
}

#main p {
  color: blue; /* loses to !important even with higher specificity */
}!important, specificity decides again — creating a confusing loop. Best practice: fix specificity issues by improving your selector structure instead of using !important.
✅ Utility classes that must always apply (like a
.hidden class)✅ Overriding third-party library styles when you can't change their CSS
✅ Accessibility overrides
❌ Never use to fix specificity wars in your own code — refactor instead
✅ ✏️ Live Interactive CSS Code Editor
Edit the HTML and CSS below and see the result instantly in the live preview. Try the preset examples — or write your own CSS from scratch!
🧠 CSS Syntax – Yes/No Knowledge Check
Answer each question with Yes or No. See your score at the end!
;?// for comments in standard CSS?COLOR: RED cause an error?)!important rule override all other CSS rules regardless of specificity?.box have higher specificity than an element selector p?!important frequently to fix CSS conflicts?✅ Common CSS Syntax Mistakes to Avoid
Wrong:
color: red font-size: 16px; — missing semicolon makes font-size fail silently.Correct:
color: red; font-size: 16px;
Wrong:
h1 color: blue; — no braces = invalid CSS.Correct:
h1 { color: blue; }
Wrong:
// This is a comment — not valid in CSS.Correct:
/* This is a comment */
Wrong:
backround-color: blue; — typo; browser silently ignores it with no error.Correct:
background-color: blue; — use browser DevTools (F12) to spot these.
Class:
.classname — can be used on multiple elements on the same page.ID:
#idname — must be unique; only one element per page should have each ID.
Using
!important everywhere makes cascading unpredictable. Fix specificity issues by writing better selectors — not by throwing !important at every conflict.
✅ Frequently Asked Questions (FAQ)
selector { property: value; }. The selector targets HTML elements, the property is what to change, and the value is how to change it.h1, p), class selectors (.classname), ID selectors (#idname), and universal selector (*).color, font-size). A CSS value is what you set it to (red, 16px). They are paired as property: value; inside a declaration block.COLOR: RED works the same as color: red. However, HTML class names and IDs used in selectors ARE case sensitive. Always write CSS keywords in lowercase as a best practice./* comment */ syntax. Single-line comments with // do NOT work in standard CSS. Multi-line comments are also supported: /* line 1
line 2 */. Comments are completely ignored by the browser.!important > inline style > ID > class/pseudo-class > element > universal. When equal specificity, the last rule wins.
✅ CSS Comments
CSS comments let you add notes in your code. They are completely ignored by the browser — they never affect styling. Comments help document your CSS for yourself and other developers.
✅ CSS Comment Syntax:-
Wrong:
// This won't work in CSSCorrect:
/* This works in CSS */The // syntax only works in JavaScript, C++, and SCSS/LESS preprocessors — not in standard CSS.